martedì 29 gennaio 2008
cinema
usando come base lo spin-art, di Dave Parker,
primo tentantivo di fenachistoscopio:
motore B usato come joystick per la velocita' del motore A (supporto figura);
motore C usato come joystick per la frequenza di lampeggio del sensore di luce (usato solo come generatore).
Con pazienza si cerca la giusta combinazione;
secondo tentativo: luce sempre accesa e secondo cartoncino con buchi come da fotografia in modo da assicurare il sincronismo per costruzione.
altra immagine da stampare.
lunedì 28 gennaio 2008
domenica 27 gennaio 2008
sabato 19 gennaio 2008
domenica 13 gennaio 2008
istruzioni di montaggio
i miglioramenti sono lasciati al costruttore...
qui le foto
sabato 12 gennaio 2008
lego NXT segway
(immagine png, scaricabile e zoomabile)
questo e' il programma NXT-G che realizza il PID (numeri interi) per il NXT-way standard, che in nbc viene implementato cosi':
http://www.philohome.com/nxtway/nxtway.nbc
(da http://www.philohome.com/nxtway/nxtway.htm)
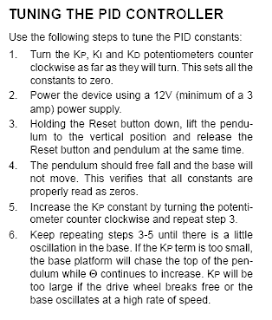
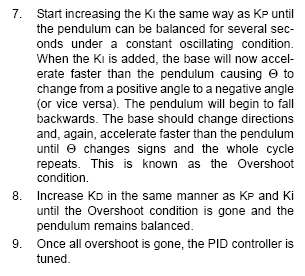
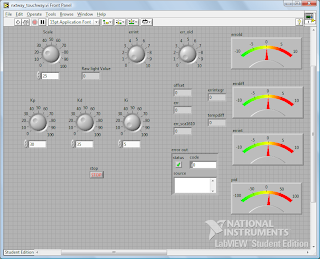
il programma touchway5.rbt in figura e' stato realizzato da
http://www.freewebs.com/thesystemprogrammer/
per approfondimenti, vedere tesi di Serra
http://www.epokh.org/tesi/TesiMathSerra.pdf
E
http://nikemagic.altervista.org/download/Servo/progetto_pendolo_pid.pdf
http://www.plcforum.info/didattica/conreg/conreg.htm
E, ma in inglese,
http://www.microchip.com/stellent/idcplg?IdcService=SS_GET_PAGE&nodeId=1824&appnote=en021807
da http://www.pages.drexel.edu/~ttl28/thesis.html#labview :
Modeling/Simulation
One major challange is how to properly model this system i.e. a specific transfer function. To identify the system, I first began but re-designing the model in SolidWorks to find the robot's Center-of-Mass and Moment-of-Inertia to use in plant designs of mobile inverted pendulums.
qui simulazioni con matlab
invece, per i poveracci, le simulazioni si possono fare con scilab, seguendo l'esempio:
utile guida per scicos/scilab : Bucher
sistemi MIMO in scilab: http://www.wolffdata.se/scilab/mimo1.html
di interesse:
http://madrobotics.blogspot.com/
Nel caso si abbiano 2 sensori di luce a disposizione (in realta' nel testo si dice che funziona anche con uno, quello dietro, "hinter"):
http://www.uni-kassel.de/fb16/rat/diplom/Diplom1Mayer.pdf
tale tesi ad opera di Sybille Mayer, in tedesco, e' veramente interessante.
Viene presentato il modello di pendolo inverso IMPERNIATO SU RUOTE (cosa non affrontata in altri lavori); dopo linearizzazione viene identificato il modello del motore
Il modello meccanico e' a pagina 24.
(risposta al gradino) e il modello del sensore di luce (con interessante digressione sul comportamento su pavimenti di colore diverso...).A questo punto SM progetta il regolatore sfruttando sia il sensore di luce (anche 1 solo) e il sensore di rotazione nel motore. L'idea e' un PD sulla luce,cioe' l'angolo alfa, e un PID sulla rotazione cioe' l'angolo gamma. Per intenderci alfa+gamma e' la rotazione della ruota, che moltiplicata per il raggio da' lo spostamento del NXTway dalla posizione iniziale. Il sistema totale e' a pagina 36 (PD+PD), con variante (PD+PID) alla pagina 37.
Le simulazioni sono basate su questo modello del sistema (simulink):
Il programma per NXT-G (sic!) e' scaricabile qui:
http://forums.nxtasy.org/index.php?act=attach&type=post&id=616
NB: nel programma i coefficienti sono leggermente diversi da quelli teorici.
codice scilab per analizzare il sistema di Sybille da lanciare con exec nomefile:
A=[0,1,0,0; 94.05,0,0,1.3;0,0,0,1; -544.05,0,0,-14.3];
B=[0;-0.21;0;2.32];
C=[1,0,0,0;0,0,1,0];
D=[0;0];
nxtway_SYB=syslin('c',A,B,C,D);
s=%s;
nxtway_SYBtf=ss2tf(nxtway_SYB) // passo nel dominio Laplace
cl_nxtway_SYBtf=clean(nxtway_SYBtf) // mette a zero i coefficienti infinitesimi
t=0:0.01:1;
u=ones(1:length(t)); // step input
y=csim(u,t,nxtway_SYB); // risposta al gradino instabile
xset('window',1);
xbasc()
plot2d(t,y(2,:))
plot2d(t,y(1,:), style=5)
// poli del sistema
spec(A)
autovalori_di_A=spec(A)
// dalle specifiche ai poli desiderati
os=9.48 // overshoot desiderato
ts=0.74 // settling time desiderato
os=os/100
xi=-log(os)/sqrt(%pi*%pi+log(os)*log(os)) //smorzamento xi
tetaxi=acos(xi)
wn=(-log(0.02*sqrt(1-xi*xi)))/(ts*xi) // risonanza wn
th=acos(xi)
ps=-xi*wn+%i*wn*sqrt(1-xi*xi); // uno dei 2 poli complessi coniugati del sys 2o ordine per fare os e ts
cl_nxtway_SYBtf(2,1)
trfmod(cl_nxtway_SYBtf(2,1),'p') // calcolo dei poli e degli zeri
poli_desiderati=[-6 -2 ps conj(ps)] // poli sono i desiderati
K=ppol(A,B,poli_desiderati) // calcolo della matrice di feedback K
F=A-B*K // sistema in retroazione
g2=syslin('c',F,B,C,D)
t=0:0.01:3;
u=ones(1:length(t)); // step input
y=csim(u,t,g2); // risposta al gradino controllato
xset('window',1);
xbasc()
plot2d(t,y(2,:))
plot2d(t,y(1,:), style=5)
scicos
Altro progetto, in tedesco, con NXT controllato voa USB (purtroppo Labview8.2) oppure standalone:
http://projekte6.fhnw.ch/technik/eit/Herbst2007/BruWid/
In italiano:
Infine una bella carrellata di robot affini:
http://leiwww.epfl.ch/joe/joerelatives.htmlinteressante pendolo pilotato verticalmente:
http://www.zfm.ethz.ch/~leine/vertically_driven_pendulum.htm
con istruzioni
http://www.zfm.ethz.ch/~leine/LEGO/VerticallyDrivenPendulum/VDPBuildinginstructions.pdf
anche questo:
cosa passa sulla usb? USB Sniffer
http://sourceforge.net/project/showfiles.php?group_id=34567
venerdì 11 gennaio 2008
giovedì 10 gennaio 2008
simulatore NXT
occorre pero' matlab > 2006a
scaricabile a
http://www.mathworks.com/matlabcentral/fileexchange/loadFile.do?objectId=13399&objectType=file
per il firmware:
http://lejos-osek.sourceforge.net/
martedì 8 gennaio 2008
elenco blocchi NXT-G scaricabili
Here’s a compilation of all available NXT-G blocks NOT included in the NXT-G software installation. Guy Ziv divided these into groups corresponding (more or less) to the ‘Pallete’ for which these should be imported.
Note that in order to use these new blocks, you need to have the Dynamic Block Update installed. You can download it from http://mindstorms.lego.com/support/updates/
Action
Name | Description | Creator | Ver. | Link |
---|---|---|---|---|
Display Number | Display a caption and a number on the NXT screen | Steve Hassenplug | 1.0 | click me |
Display Time | Display the value of a timer in minutes and seconds | Steve Hassenplug | 1.0 | click me |
Mindsensor MotorMux | NXT-G block for mindsensors motor multiplexer (MTRMX-Nx) | mindsensors | 1.0 | click me |
Line Following | Make your robot follow the edge of a line using a single light sensor | Steve Hassenplug | 1.0 | click me |
RCX to NXT communication adapter | NXT-G block for mindsensors RCX to NXT communication adapter. | mindsensors | 1.1 | click me |
Mini Block Library | Mini Move, Mini Motor, Mini Display and Mini Sound - optimized blocks for smaller programs | LEGO | 1.0 | click me |
Sensor
Name | Description | Creator | Ver. | Link |
---|---|---|---|---|
Memory Level | Find how much Flash is available | Guy Ziv | 1.0 | click me |
Battery Level | Find how much power your NXT has | Guy Ziv | 1.1 | click me |
Motor Power Meter | Measure actual power sent to NXT motors - detects stall and slip | Guy Ziv | 1.0 | click me |
HiTechnic Acceleration Sensor | NXT-G block for HiTechnic acceleration sensor | HiTechnic | 1.0 | click me |
Mindsensors Pressure Sensor | NXT-G block for mindsensors pressure sensor (PPS35-Nx) | Mindsensors | 1.0 | click me |
HiTechnic Color Sensor | NXT-G block for HiTechnic color sensor | HiTechnic | 1.0 | click me |
HiTechnic Compass Sensor | NXT-G block for HiTechnic compass sensor | HiTechnic | 1.1 | click me |
mindsensors PS2 controller interface | NXT-G block for mindsensors PS2 controller interface (PSP-Nx) | Guy Ziv | 1.1 | click me |
Sharp IR sensor | NXT-G block for mindsensors DIST-Nx Sharp IR sensor | mindsensors | 1.1b | click me |
Legacy sensors | NXT-G blocks for Legacy (RCX) sensors and actions - RCX motor, lamp, touch sensor, light sensor, rotation sensor and temperature sensor | LEGO | 1.0 | click me |
TS Air Pressure Sensor | NXT-G blocks for Techno-stuff air pressure sensor | Techno stuff | 1.0 | click me |
TS PIR Sensor | NXT-G blocks for Techno-stuff motion detector (passive IR sensor) | Techno stuff | 1.0 | click me |
Real-time clock | NXT-G blocks for mindsensors.com real-time clock | mindsensors | 1.0 | click me |
CdS Light Sensor | NXT-G blocks for homebrew CdS Light Sensor with LED Control | Michael Gasperi | 1.0 | click me |
HiTechnic Gyro Sensor | NXT-G block for HiTechnic gyro sensor | HiTechnic | 1.0 | click me |
Data
Name | Description | Creator | Ver. | Link |
---|---|---|---|---|
Fixed-Point Math | Basic algebraic operations with fractional (fixed-point) numbers | Guy Ziv | 1.0 | click me |
Seed Random Generator | Generate a reproducable series of random numbers | Michael Gasperi | 1.0 | click me |
MinMax | Find the minimal and maximal value of some wire | Guy Ziv | 1.0 | click me |
Sine and Cosine | Calculate sine and cosine of angle | Claude Baumann | 1.1 | click me |
Arctangent | Calculate arctangent | Claude Baumann | 1.0 | click me |
Arctangent 2 | Calculate arctangent from (x,y) coordinates of a given vector | Claude Baumann | 1.1 | click me |
Square Root | Calculation of (integer) square root of the input | Claude Baumann | 1.0 | click me |
Number to char | Convert a numerical input into an ASCII char | xw25adc | 1.0a | click me |
Power | Calculate X to the power Y | Michael Gasperi | 1.0 | click me |
Text Manipulation | Five different text manipulation blocks | Jasonking | 1.0 | click me |
Average | Calculate running average of input | Guy Ziv | 1.0 | click me |
MathScript | Calculate complex mathematical expressions | Guy Ziv | 1.0 | click me |
Advanced
Name | Description | Creator | Ver. | Link |
---|---|---|---|---|
Bit Logic | Bitwise operations on numbers (And, Or, Xor, and Not) | Michael Gasperi Steve Hassenplug | 1.0 | click me |
Mask Block | Bitwise AND between the input and the mask | Michael Gasperi | 1.0 | click me |
I2C Read/Write | General purpose I2C read and write blocks for low-level communication to I2C sensors/devices | xw25adc | 1.0 | click me |
Simple Array | Simple array block | Steve Hassenplug | 1.0 | click me |
Advanced Array | Advanced array block | Guy Ziv | 1.0 | click me |
Template VI Library | A template block (non-functional) for NXT-G developers. Use for creating blocks that encapsulate many different functions | Guy Ziv | 1.0 | click me |
PCF8574 kit | NXT-G block for mindsensors PCF8574 kit | mindsensors | 1.2 | click me |
Digital-to-Analog | Interfaces the NXT with the 8 channel TDA8444 DAC | Michael Gasperi | 1.0 | click me |
If you know of any released NXT-G block not listed above, or developed a new block and wish it to appear in this list - please email Guy Ziv
tecnica avanzata Labview
non usare shift registers nel toolkit: sono troppo lenti
http://nxtasy.org/2007/04/12/advanced-nxt-g-block-techniques-part-iv/
sabato 5 gennaio 2008
spassosa discussione sul forum nxtasy.org riguardo NXT-G
Discussione fra JasonKing e BrianDavis a proposito del tool che ripulisce il programma dai fili "inutili"
http://forums.nxtasy.org/index.php?showtopic=444&hl=Remove+Bad+Wires
e quello che permette di impostare i setting di apertura del programma
http://forums.nxtasy.org/index.php?showtopic=1532&hl=Modify%20User%20Settings%20Tool&st=0
Da questa discussione si ha anche modo di scoprire alcuni trucchi che Davis riassume cosi':
QUOTE
I wonder if somehow in that content there's info on the editing environment?
Traces, but not a lot - certainly not as much as I feel would be useful. As an example, when you look at the help files on wires, they mention that you can click on the right-hand plug on a datawire to delete it (that's the only place I can find official reference to that ability). But it doesn't mention, for instance, that that only deletes the wire from the plug to the nearest branch point, not all the connected wires... which is what clicking an actual wire (selecting the wire) and pressing delete does. That's another one of those fine points that can be really handy to know.
QUOTE
You should draw up such a document, in HTML format, and that way the whole community can benefit from your list of shortcuts and tips/tricks. You actually know more of them than I do at this point, I think smile.gif
I'm not sure that I know more of them than you do at this point, but I do have a list of stuff drawn up in a Word document that I should try to polish and add screenshots. Things like...
* The fact that you can "stretch" and "shrink" the sequence beams by clicking and dragging horizontally with the cursor on the sequence beam between blocks.
* That you can multiplex wires into/out of Switch structures ([i[]much[/i] easier, now that someone has released a tool that highlights where the tunnels through the structure boundries are smile.gif ).
* A copy & paste operation drops the resulting pasted code in the largest clear area near the last cursor click position.
* You can option-drag (alt drag on a PC [qui fa un errore perche' si deve fare CNTRL drag per clonare ... ) an existing emplaced, configured block to make a "clone", a copy of the block with the the configuration pane set-up, and even the position of the datahb copied.
* If you need to select a large section of code (larger than a single screen), you can shift-click to add new blocks to an existing selection.
* Selecting a Switch or Loop selects everything within it as well.
* You can use the arrow keys to scroll the screen L/R/U/D. Using fn-Up or fn-Down can scroll the screen by a larger distance L or R, speeding up the process, while "home" (fn-L) or "end" (fn-R) will take you to the start or end of the program.
* When editing the icons for a My Block, you can move them or resize them, but the order that they overlap in is determined by the order they were dropped in, and if you want to delete an icon that you've dropped, you can select it and type fn-delete. Even if the icons seem cut off on the edge of the editing window, they may appear complete on the block image.
* Clicking & dragging on a section of existing wire will move it around (sometimes revealing hidden bends that are handy)
* While dragging a wire out (before you secure the end), tapping the space bar can make it flip from "up-and-over" to "over-and-up" and back again.
* Using crowbars to open Loops and Switches.
* Using a text comment "pin" to hold those stretched structures open.
Brian Davis
Aggiunta di Jason:
Tab key will cycle through the different tools.
1-2-3 wil cycle in the palettes
crowbar: uno switch, per esempio, inserito in un loop altrimenti stretto, allo scopo ti allargarlo, mettendo dentro lo switch un blocco dummy con un hub molto lungo, ad esempio il display. E' un trucco per facilitare la stesura del programma.
giochi semplici da far girare sul NXT
http://news.lugnet.com/robotics/nxt/?n=313
gli rbt si aprono con NXT-G
gli rxe si caricano sempre via NXT-G con la finestrella di download
gli nbc van compilati con Brixcc
altri programmi su
http://sorosy.com/lego/nxtarcade/
venerdì 4 gennaio 2008
test fatti sui sensori e i motori del NXT
ETH Zurich, July 2006
Claudia [fclaudia@ee.ethz.ch] & Thomas [tother@ee.ethz.ch]
US
Mia nota:
Il materiale e' importante.
Ad esempio il pelo di gatto e' invisibile (stealth)!
The dynamic test revealed two weaknesses of the ultrasonic sensor. The first issue is that it showed some areas where the sensor tends to measure 255 cm instead of the actual distance. The second even more important issue is the critical area in between 25 cm and 50 cm where the sensor has a high probability of returning the wrong value of 48 cm.
Sensore di luce
Sensore pressione
The touch sensor has been examined towards the force needed to close the touch circuit. Adding weights to the vertical positioned sensor showed that at 34 grams the appears as touched. So in general a force of 0.33 newton must be exerted so the sensor is able to discern a contact.
Immagini oscilloscopiotraduzione capitolo 1 The Mayan Adventure
http://www.bluerocketwriting.com/MayanAdventure.pdf
Tomba, trappola e innesco
Posto: Guatemala
85 miglia SO di Guatemala City
Coordinate: 14º 02' N / 90º 42' W
Condizioni meteo: 94 gradi Fahrenheit, umidita' 40%
Giorno 2: Scavi della tomba del Re Ixtua. 4:42 PM
Evan si appoggio' contro una grossa pietra alla base della piramide e si spruzzo' altro repellente per insetti sul braccio sinistro. La puzza era orribile, ma a differenza della crema solare, almeno quello funzionava. Evan non era sicuro di cosa fosse piu' bruciato, se il suo naso o le sue orecchie. Non vedeva l'ora di entrare nella piramide e ripararsi all'ombra. La piramide e il campo base erano completamente coperti dalla giungla e non erano visibili dall'alto, ma la luce del sole riusciva lo stesso a trovare la strada attraverso le foglie e i rami e a scaldare l'aria.
“C'e' un piccolo problema qui,” disse Zio Phillip allontanandosi dall'ingresso della tomba maya costituito da una grossa pietra. Continuava ad camminare su e giu' per l'accampamento con i suoi assistenti Max e Grace, che correvano per stargli dietro.
Evan si giro' e corse a raggiungere suo zio. “Cosa non va?” chiese, quasi andando addosso a due guide guatemalteche che stavano trasportando una scatola di materiale da scavo.
“Seguimi, Evan, e te lo faccio vedere”, rispose zio Phillip, continuando a camminare verso la tenda delle comunicazioni radio.
Il dottor Phillip Hicks era il capo degli scavi di una tomba maya scoperta da poco, nell'intrico della giungla del Guatemala. Lo zio di Evan era professore di archeologia e insegnava all'Universita' della Florida, ma saltava di gioia ogni volta che aveva la possibilita' di lasciare la classe e fare ricerche sul campo. Due settimane prima i genitori di Evan avevano ricevuto una chiamata da zio Phillip, in cui chiedeva se Evan poteva accompagnarlo; i suoi genitori avevano acconsentito a che viaggiasse con lo zio per qualche settimana a completamento delle vacanze estive. Sarebbe stato anche un piacevole stacco dai fratellini gemelli di Evan, Les e Wes.
Quando misero piede nella tenda, zio Phillip lancio' il cappellino dell'Universita' su una sedia li' vicino. Vicino alla sedia c'era un grosso baule pieno di libri e strane apparecchiature. Zio Phillip era esperto di storia maya, e quella mattina aveva mostrato a Evan una figura di glifo maya da uno dei suoi libri. Zio Phillip aveva detto a Evan che lo strano simbolo rappresentava il Re Ixtua. Quello stesso simbolo era scolpito nella pietra sopra l'ingresso della tomba, confermando che la piramide era la tomba dell'antico re maya.
Zio Phillip comincio' a spiegare mappe sul tavolo, cercando qualcosa. “Dov'e' l'ingrandimento del manoscritto di Tupaxu? Quel disegno ora mi dice qualcosa” disse.
Uno degli assistenti, Max, stava cercando sul tavolino di lato. Evan se ne stava tranquillo, senza intenzione di intervenire. L'altra assistente, Grace, comincio' a rovistare nel baule di libri.
“Hai mai sentito la storia di Re Ixtua, Evan?” chiese zio Phillip. Egli continuava intanto a aprire mappe e fogli sul tavolo.
Evan scosse la testa. “Nossignore. I miei voti in Storia non sono granche'. Mi spiace”
“Non fa niente,” replico' lo zio “Non mi sono mai veramente interessato a Storia fino alle superiori. Ma penso che questa storia ti piacera'.”
L'ultima verifica di Storia non era andata molto bene a Evan; Scienze e Matematica gli piacevano di piu'. Ma quando suo zio gli aveva detto che questa piramide non era mai stata aperta ed era stata nascosta per piu' di 700 anni, Evan non pote' resistere: aveva fatto i bagagli, incluso il lettore MP3, il portatile e il nuovo gioco di robotica che aveva ricevuto in regalo per il suo compleanno il mese prima e aveva raggiunto lo zio in aeroporto. Se anche la piramide si fosse rivelata una noiosa montagna di pietre, avrebbe comunque avuto con se' la sua musica e avrebbe passato un po' di tempo a progettare robot da mostrare agli amici al suo ritorno.
“A questo Re Ixtua piacevano le scimmie, capisci” stava dicendo zio Phillip mentre cercava in una piccola pila di mappe e carte. “Aveva numerose scimmie-ragno a cui insegnava dei trucchi. La leggenda dice che Re Ixtua si fece costruire una piramide come casa del suo riposo finale. Per tene fuori i saccheggiatori di tombe e altri ospiti indesiderati, fece progettare la piramide in modo che solo qualcuno amico delle sue scimmie potesse accedere alla tomba. Bella leggenda, vero?”
“Bizzarra,” disse Evan, e rise. Suo zio gli sorrise e si mise a ridere pure lui.
“Trovata!” grido' Max, tirando fuori un grande foglio di carta e portandolo a zio Phillip. Evan osservava lo zio che con cura dispiegava il foglio sul tavolo davanti a tutti gli altri.
“Due anni fa, Evan, uno dei miei vecchi professori trovo' un manoscritto maya in una giara sigillata in uno scavo e lo diede a me. I la tradussi e scoprii che venne scritta da Tupaxu, il costruttore della piramide del Re. Dava una descrizione generale della posizione della piramide, fra le altre cose,” disse lo zio. “Guarda qua” puntando il dito ad uno strano disegno sul foglio.
Evan guardo' il piccolo disegno. Era circondato dalle starne scritture maya che aveva visto sulle rovine all'accampamento.
Scosse la testa: “Cos'e'?” chiese.
Grace indico' le scritte. “E' il disegno di un piccolo tunnel. Tuo zio aveva ragione riguardo alle scimmie, a quanto pare” disse “ quel disegno ci mostra come sbloccare la pietra d'ingresso alla tomba.”
Evan continuava a non capire. “Cosa sono questi simboli?” chiese, indicando le piccole figure.
“Misure,” rispose lo zio. “ Queste misure si traducono in un'entrata del tunnel alta circa 45 cm e larga 45cm. Troppo piccola per una persona, ma della giusta grandezza per una scimmia-ragno.”
“Ma se hai trovato la porta, perche' non fai un buco o la butti giu'?” chiese Evan.
Zio Phillip scosse la testa. “ Primo, non distruggiamo ne' danneggiamo le rovine. E secondo, la porta ha un meccanismo che e' disattivato da un pulsante. Se il pulsante non viene premuto, il meccanismo, qualunque cosa sia, scattera' quando apriamo o buttiamo giu' la porta. Tupaxu era un progettista molto intelligente.
“Allora devi solo trovare il pulsante e schiacciarlo, giusto?” chiese Evan.
“La prima cosa e' facile, Evan” disse lo zio. “Abbiamo trovato il pulsante, ma e' in un brutto posto. Vieni che ti faccio vedere.”
La Prova del Tunnel
Evan punto' la torcia giu' per il tunnel. Il fascio di luce finiva a 3 metri di distanza, dove il tunnel curvava a sinistra e continuava.
“Secondo il manoscritto, il tunnel e' profondo 3 metri. Poi gira a sinistra e prosegue per 1,8 metri e infine gira a sinistra e prosegue per 1,8 metri. Alla fine c'e' una piastra, un pulsante piatto.” disse lo zio “ Se la piastra non viene premuta, non si puo' entrare nella tomba”.
tesi di Rosanna Rinaldi, tesi di M. Chiara Maimonte
http://www.di.unito.it/~barbara/MicRobot/TesiNQCBaby/Tesi_Rosanna%20Rinaldi.doc
http://robotica.irrepiemonte.it/robotica/biblografia/doc/Universit%C3%A0%20degli%20Studi%20di%20Torino_Robotica.pdf
giovedì 3 gennaio 2008
raccolta links Samuele e Valter
interessante ohmetro
http://digilander.libero.it/Valter_NXT/ohmmetronxt.html
sito Piemonte (NBCjunior): Marciano'
guida NBC in italiano con inserti riguardanti NBCjunior
Non riusciro' mai a capire perche' questi maestri/professori trovino piu' utile (per la didattica verso bambini delle elementari) un linguaggio testuale di un linguaggio grafico come nxt-g.
Comunque loro hanno esperienza sul campo.
Eurologo 2007
G. Barbara Demo, barbara@di.unito.it
Dept of Informatics, Turin University – Italy
Giovanni Marcianó, marciano@irrepiemonte.it – margi@bmm.it
National Agency for Development of Schools - Piedmont, Ministry of Public Education - Italy
Abstract
In primary schools robot programming is fun and may therefore represent an excellent tool both for introducing to ICT and for helping the development of logical and linguistic abilities of schoolchildren. Core of our project is NQCBaby, a Logo-like robot programming language, which – in the tradition of Logo – is child-oriented rather than robot-oriented like NQC. In the early 90's S. Papert had already suggested the educational use of ”small robots programmed in Logo” [Papert 1993]. We had robots, of course we had Logo, but we had no Logo for robots. NQCBaby is an Italian version of a Logo-like interface to NQC, so that children used to deal with the Turtle can transfer and adapt their implicit abilities to robots, also discussing the differences. In the kind of activities we consider, schoolchildren start by using a very simple language, the first level of NQCBaby, to interact with the simplest robots RCX; later, as their robot-assembly experience grows, they move on to successively richer versions of the language. As a matter of fact, the constructive pedagogical methodology (and consequently our tools) structures the learning of NQCBaby in several steps, starting with NQCBaby01 up to NQCBaby05, as new hardware components are introduced to build new more sophisticated kinds of robots. In the meanwhile children are also introduced to NQC, the “real” robot language, by looking at how their descriptions of robot behaviors are translated into NQC “in order to be understood by robots”. This step-by-step activity of schoolchildren is coordinated with the parallel learning of the basic linguistic abilities in their native language. A software environment, based on a precompiler from NQCBaby to NQC, is currently being developed for supporting the project principles, in a sequence of levels of increasing complexity and abstraction from NQCBaby01 to NQCBaby05.
Figure 1. Children assemble a robot, decide behaviour, describe it in NQCBabyh, and look at the resulting specification in NQC; then they enter the next step to learn the next level NQCBabyh+1
Eurologo 2007
LOGO per NXT:
http://virtuallab.kar.elf.stuba.sk/robowiki/index.php/Logo_for_NXT
LOGO and NQCbaby – programming Microworlds and Robots according to Logo Philosophy
Simonetta Siega, simonetta.siega@istruzione.it
I.C. “A. Fogazzaro”, Primary school of Baveno (VB) - Italy
Abstract
This workshop is related to Barbara Demo’s and Giovanni Marcianò’s long work “Contributing to the development of Linguistic and Logical Abilities through Robotics”, to demonstrate the experiences of my pupils in these last four years.
My goal was to realize a cognitive laboratory in which pupils could develop their logical concepts, according to Feuerstein’s and Papert’s pedagogical approaches, and using the resources offered by technology. First, using only computers, using the linguistic tool LOGO to give rules and life to the turtles, and then using NQC to repeat the same activity with small robots, the LEGO RCX.
Thanks to Giovanni Marcianò we used an Italian release of David Baum’s NQC open-source programming language for LEGO RCX, NQCbaby, in which pupils found once more the LOGO primitives (avanti, indietro, destra, sinistra, ripeti n …) that they already know well.
Since the first experiences the pupils realized that “The robot is a turtle that became intelligent enough to go out of the computer for running all around the world!”.
Pupils can manipulate the double environment, the virtual multi-medial microworld and the real LEGO RCX robot, taking advantage of both in learning how to program with an artificial language, which is similar to their natural language. But also to develop and reinforce in children logical and linguistic competences.
nxt nella scuola
http://www.di.unito.it/~barbara/MicRobot/
comprende tesi di laurea su NQCbaby
how to configure bluetooth for NXT
Bluetooth with Bluesoleil USB port
Method : install widcomm drivers
In english:
http://www.howardforums.com/archive/topic/1011753-1.html
details:
http://forum.gsmhosting.com/vbb/forumdisplay.php?f=237
http://forum.gsmhosting.com/vbb/showthread.php?t=342643
Well, now my (brand new, Bluesoleil, otherwise useless) adapter can communicate with the NXT (downloading-starting-stopping programs so far).
OS Vista Home Basic. NXT-G 1.1. FW 1.01.
Inserting USB-BT key
right click in tray icon: “start to use BT”
this appears:
then
then
then
only serial port enable needed
then
it requires that a remote BT be activated, so connect on NXT (PC-LUCA in this case appears on the NXT display) and a message appears on the PC tray to be clicked on
click on the white message area (it asks to)
and next:
Alfie07 is the name of the NXT. Two green arrows mean OK; a red “tick” means KO.
Done.
Now NXT-G can be run.
That configuration must be done once per account.
Other times the working sequence is (insert passwords when required):
PC-Vista on
Switch NXT on
Insert BT adapter in the USB port
Activate BT via BT-icon in the tray
On NXT search (the PC) and Connect (a message appears on the PC telling that NXT is connected)
Open NXT-G environment
Open a program
Click the NXT-icon on the NXT-download palette within the NXT-G window
Scan (unavailable should become available)
If necessary, Connect (available becomes Connected); sometimes it connects automatically, without clicking Connect, just Scanning.
NB : BT is slower than cable connection, but sometimes it is impossible to plug/unplug (repeatedly) the USB in the NXT when everything is mounted